One of the great features of Backdrop is the ability to control how and what people can access on your site. You can set permissions for these "users" to define who can do what for Backdrop core features and contributed modules. For example, you probably won't want casual visitors to edit your homepage. However, the site owner or a trusted user should be able to do so.
Roles and permissions
To access any given area or functionality of a Backdrop website, a user must be granted “permission” to do so by Backdrop’s permissions system. For example, there are separate permissions for viewing, editing and deleting pages on the website. So to allow a user the ability to edit content, the user needs to have that specific permission. To be able to view user profiles requires a separate permission, and so on.
There are dozens of permissions for multiple functions of each Backdrop site, and new modules may add additional permissions.
However, granting each user these permissions individually would be inefficient. Therefore permissions are packaged into groups of permissions called roles. Then roles can be granted to individual users. An Editor role, for example, may include permissions to access the website (of course), view all content, edit Post but not Page content, view user profiles, and so on. So for example if we want Tom our article writer to now have all the permissions of an editor, we simply grant him the Editor role.
Backdrop allows you to setup any number of different kinds of users or 'Roles.'
Out of the box, Backdrop recognizes four roles -
- Authenticated - a role granted automatically to anyone who is logged in
- Anonymous - a limited role granted automatically to anyone not logged in; only three permissions are part of this role: view published content, view comments, and access to the HTML editor.
- Editor - can edit most content on the site, but cannot modify site configuration settings.
- Administrator - persons granted this role are granted all permissions on the site
An exception is the first user created (user/1) who has and maintains all permissions by default.
Managing roles
To create (or edit) a role, navigate to Configuration > User Accounts > Roles. Type in the name of your new role (e.g. 'Member') and click 'Add role.'
Having created the 'Member' role, you could now create a user with that role. To verify this, navigate to the User Accounts > Add user account to access the form to manually create a new site user. Note that on this page there will now be a new checkbox labeled “Member” under the “Roles” group.
Roles can also be managed in bulk from the User List, discussed later in this document.
TIP: If a user has more than one role, which is quite possible, she will get permissions based on all these roles. The rule is that roles decide what you can do, not what you can't.
Permissions
Finally, you can configure permissions for Editors at Configuration > User accounts > Permissions. This page displays a matrix of available access permissions for the site with checkboxes to add these permissions to roles.
To give Editors the ability to edit any “Post” content within the site but NOT be able to edit “Page” nodes, scroll down the permissions page and click the checkbox next to “Post: Edit any content” and leave “Page: Edit any content” unchecked.
Now any user with Editor role who visits a Post will see the “Edit” tab on that piece of content and will be able to edit any Post on the website, but on visiting Page types, the “Edit” tab will be hidden.
Furthermore, if an Editor tries to bypass this and directly access a Post edit page, he will be unable. For example, if the content at the path ‘node/34’ is a post node type, and the Editor visits ‘node/34/edit’ he will get an “Access denied” warning on the site.
The initial version of this section of the Community Documentation came from the book Drupal 7: The Essentials, courtesy of NodeOne and Johan Falk.
Roles and visibility
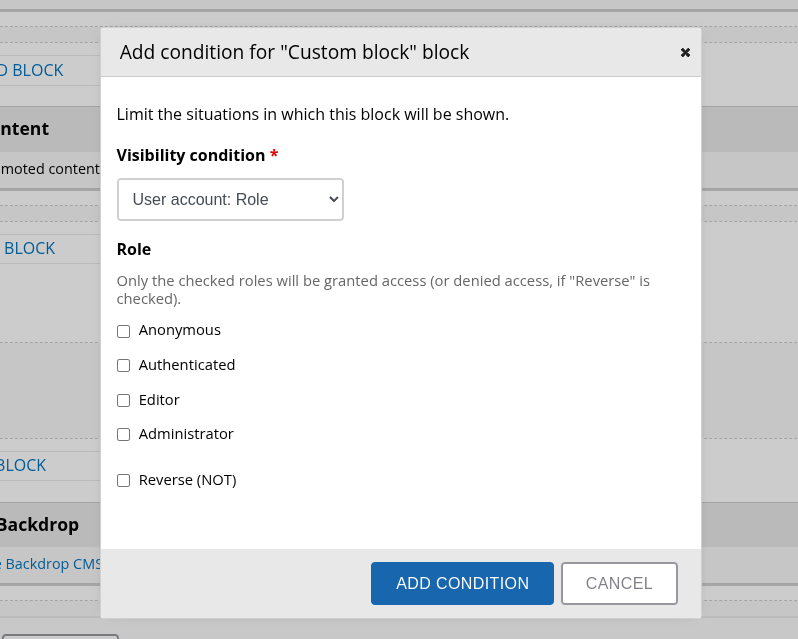
Some modules within Backdrop allow you to use roles to determine who has access to view specific views, layouts, or blocks. Role based visibility conditions make it possible for you to only display a specific page or even a specific block on a page to authenticated users with specific roles.
Managing users
The user list
Backdrop provides you with a list of all user accounts registered on your website at “/User accounts” on the Admin Bar.
There are links to view and edit each account, and there are tools for filtering and mass updating accounts.
On top of the list is a link “Add user account,” used to add new accounts to the site.
Adding and configuring users
The form for adding new accounts is very similar to the form you get when editing an existing account. Below is a description of the settings in the forms.
- Username: This is the user's name on the website, used when logging in. It must be unique.
- Current password (only when editing your own account): To change your e-mail address or password, you must usually give your current password.
- E-mail address: Like the username, the e-mail address must be unique. The reason for this is that the e-mail address should be available to use if the password or username are forgotten.
- Password/confirm password: This is the user's password, repeated to avoid misspellings. Note that Backdrop cannot show the current password. All passwords are encrypted before they are stored, and Backdrop has no way of decrypting them. If you enter a short or simple password, you will get a warning, but Backdrop won't prevent you from using it.
- Status: User accounts that are blocked cannot be used for logging in.
- Roles: This shows or sets which permission roles the user has. (See next section for details.) All users automatically have the role of authenticated user as soon as they log in.
- Picture (only on editing): This allows users to upload an image and associate it with their account.
- Locale settings (only on editing): This setting is used to change the time zone for a user.
- Notify user of the new account (only on creation): This option makes Backdrop send out an e-mail to the new user with the account information. This is the only time Backdrop sends out a password – if users lose their passwords, they will get a one-time login, rather than their existing password.
TIP: Best practice dictates that you should not use the first user account as a personal account. The first user account bypasses all access controls in Backdrop and should be available to pass on to new site managers.
TIP: The picture upload in a standard Backdrop installation is a remnant of previous Backdrop versions. Images are handled much better as fields. You can turn off the obsolete picture functionality using the Account Settings, which can be found in the Admin Bar under Configuration > User Accounts > Account settings.
User account settings
User account settings page contains a few more user settings that a Backdrop site manager should know. The most important are described below.
- Administrator role: The role set here will automatically have all permissions set in the permissions matrix.
- Registration and cancellation: This setting determines how new accounts should be created - for example, if visitors should be allowed to sign up, and also how content and accounts should be treated when an account is canceled.
- Personalization – signatures: If signatures are enabled, users will be allowed to set a signature that will be added to all their comments (but not to other content). If a user changes her signature, signatures on existing comments are also affected.
- Emails: This setting contains some e-mail templates that are used when users register, if they lose their passwords, and in some other cases. Note that there are some token replacement patterns available for dynamic replacements, such as Anonymous and .
TIP: Like the user pictures, signatures are a remnant of old Backdrop code which may be best to replace with fields.